Incoming webhooks
A Sourcegraph instance can be configured to receive events from code hosts via incoming webhooks. This allows Sourcegraph to react more quickly to events outside the instance and decreases the polling required for changes.
Webhooks currently serve three purposes for reacting to external events:
- Keeping code on Sourcegraph fresh by responding to new code being pushed to a repository
- Keeping batch changes changeset details up to date
- Speed up Sourcegraph reacting to permission changes on the code host
See the table below for code host compatibility:
| Code host | Code push | Batch changes | User permissions |
|---|---|---|---|
| GitHub | 🟢 | 🟢 | 🟢 |
| GitLab | 🟢 | 🟢 | 🔴 |
| Bitbucket Server / Datacenter | 🟢 | 🟢 | 🔴 |
| Bitbucket Cloud | 🟢 | 🟢 | 🔴 |
| Azure DevOps | 🔴 | 🟢 | 🔴 |
To receive webhooks both Sourcegraph and the code host need to be configured. To configure Sourcegraph, add an incoming webhook. Then configure webhooks on your code host
Deprecation notice
As of Sourcegraph 4.3.0 webhooks added via code host configuration are deprecated and support will be removed in release 5.1.0.
This includes any webhooks pointed at URLs starting with the following:
.api/github-webhooks.api/gitlab-webhooks.api/bitbucket-server-webhooks.api/bitbucket-cloud-webhooks
In order to continue using webhooks you need to follow the steps below to add an incoming webhook and then update the webhook configured on your code host with the new webhook url which will look something like https://sourcegraph-instance/.api/webhooks/{UUID}
Adding an incoming webhook
Before adding an incoming webhook you should ensure that you have at least one code host connection configured for the code host you want to set up incoming webhooks for.
The incoming webhook will be configured to accept events from a specific code host based on its type and URN.
- Navigate to Site Admin > Integrations > Incoming webhooks
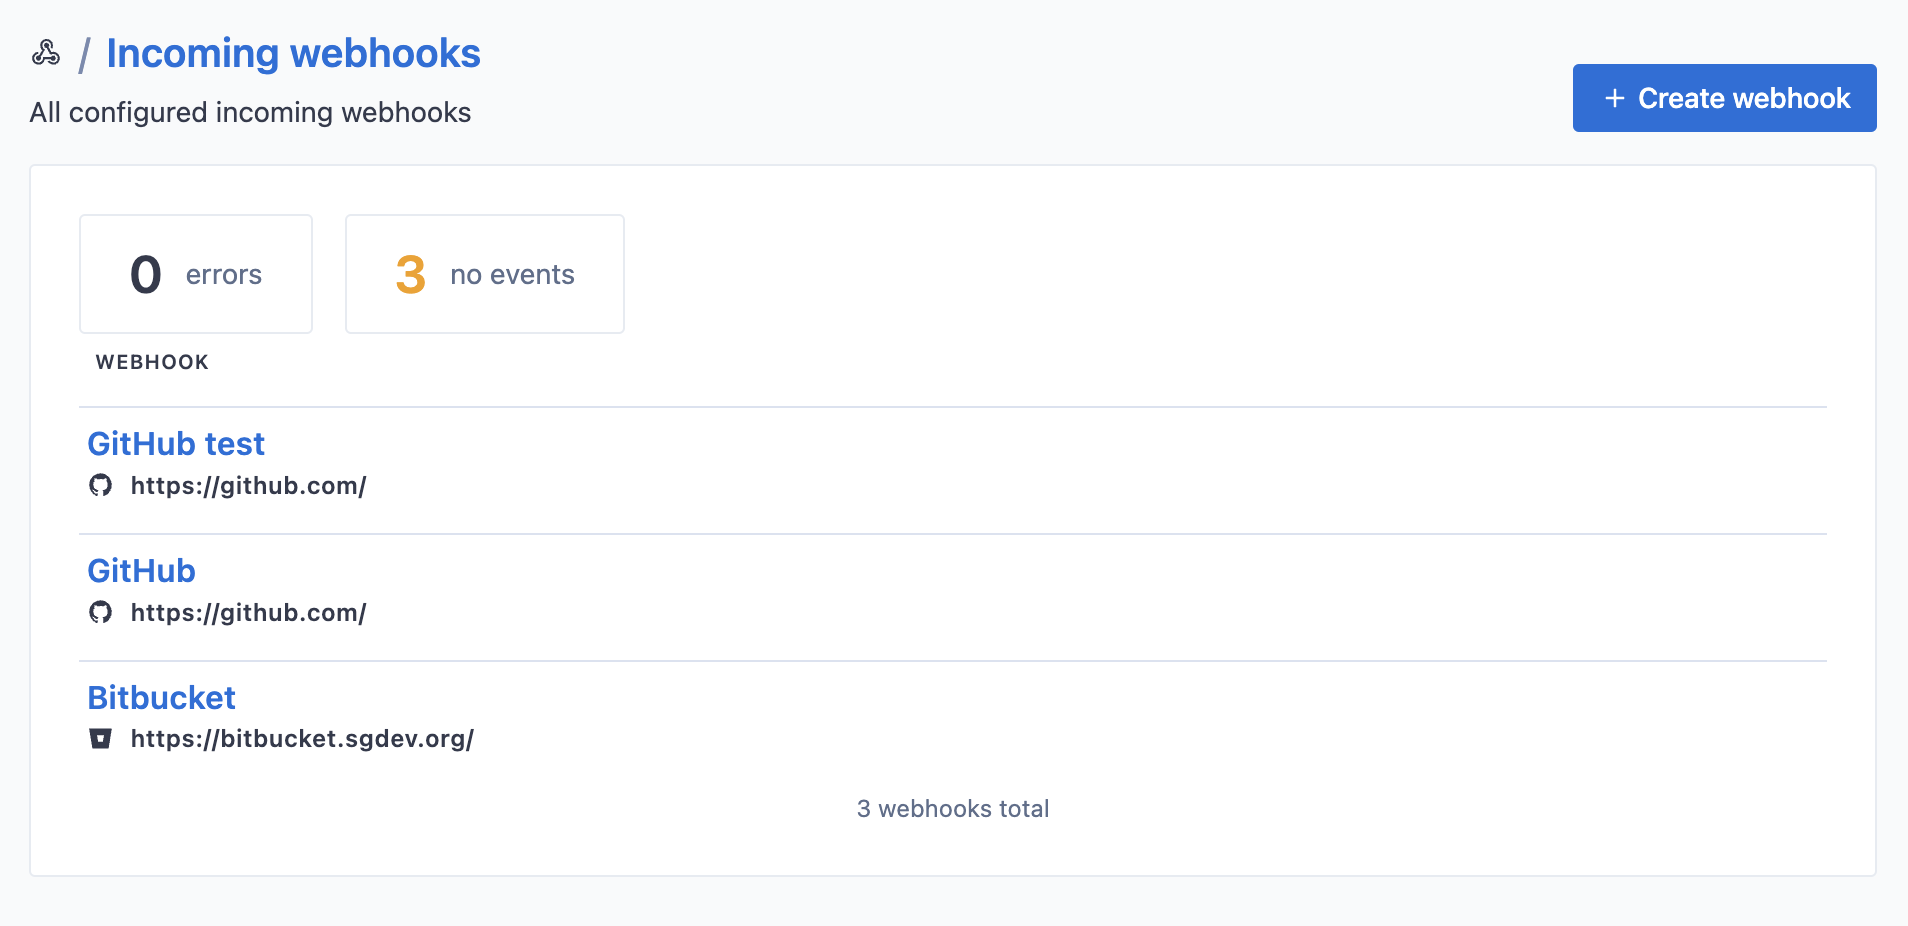
- Click + Create webhook
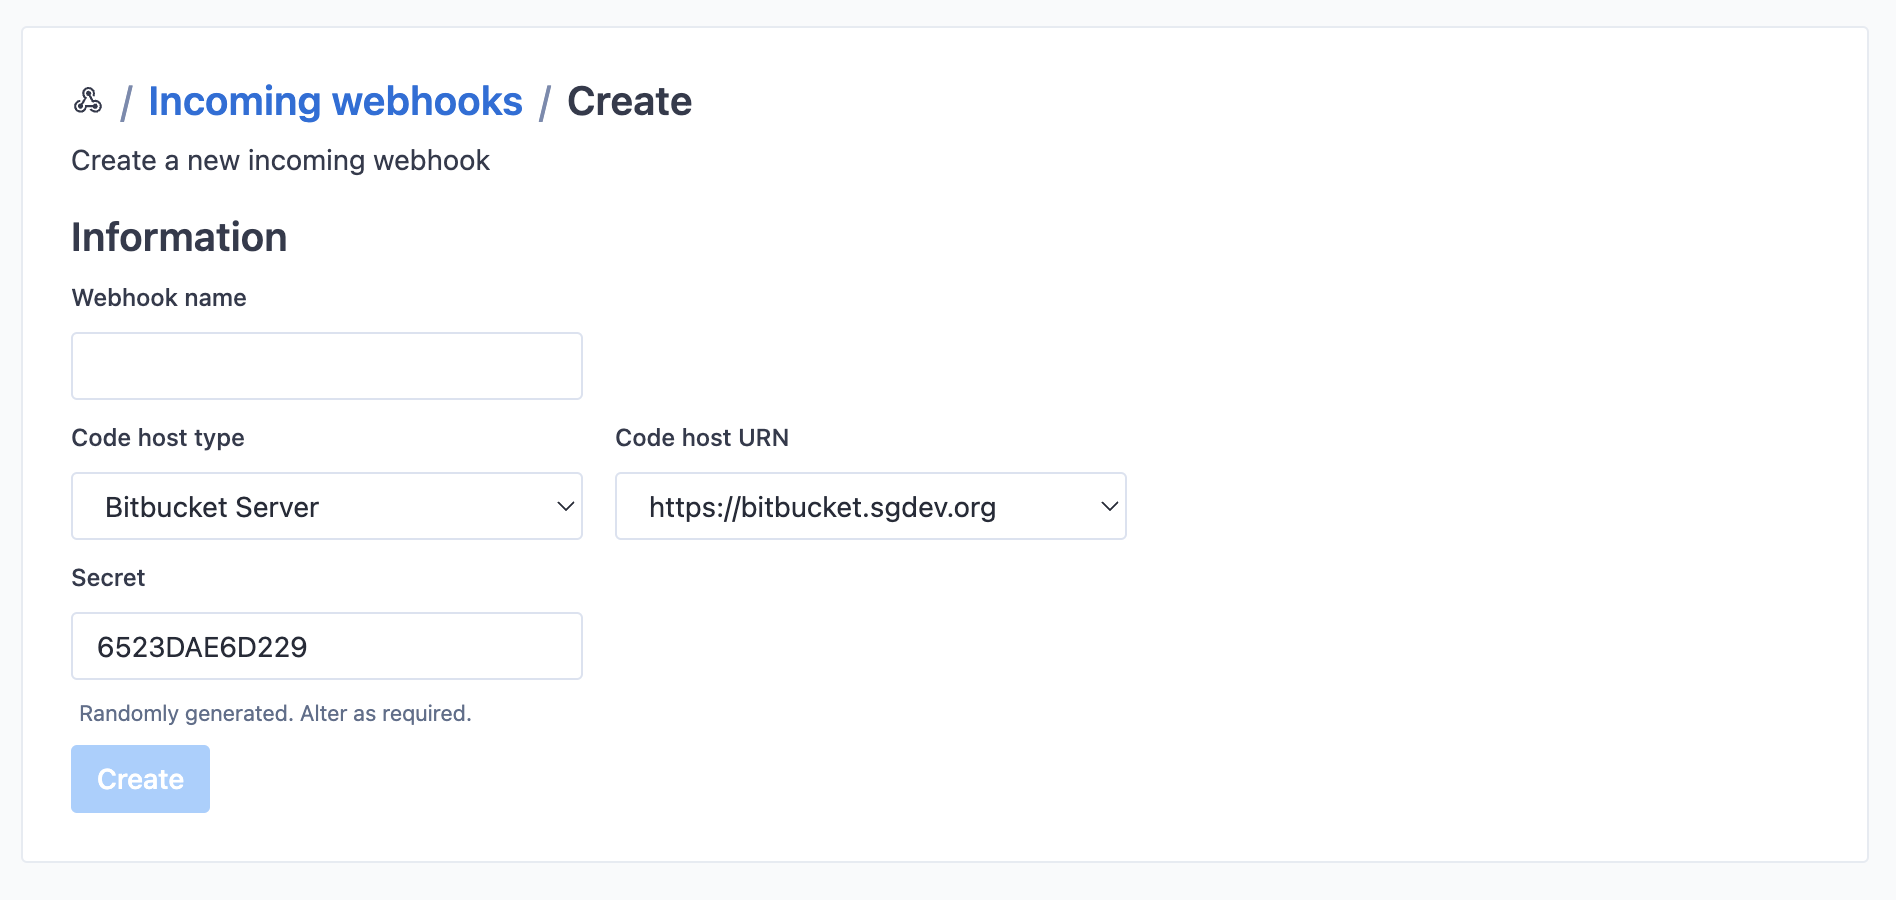
- Fill out the form:
- Webhook name: Descriptive name for the webhook.
- Code host type: Select from the dropdown. This will be filtered based on code host connections added on your instance.
- Code host URN: The URN for the code host. Again, this will be filtered by code host connections added on your instance.
- Secret: An arbitrary shared secret between Sourcegraph and the code host. A default value is provided, but you are free to change it.
- Click Create
The incoming webhook will now be created, and you will be redirected to a page showing more details.

Use the Webhook endpoint from the details page to configure the webhook on your code host.
Configuring webhooks on the code host
Follow these instructions for setting up webhooks on the code host are specific to each code host type.
GitHub
GitHub webhooks can be created at the repository level, or at the organization level. We strongly recommend using organization level webhooks, to decrease the amount of work needed to add webhooks to every repository, and ensure new repositories have the webhooks added as well.
If you use multiple organizations, make sure to configure the webhooks in all of them. The same webhook in Sourcegraph can be connected to multiple organizations.
- Copy the webhook endpoint displayed after adding the incoming webhook as mentioned above
- On GitHub, go to the settings page of your organization. From there, click Settings, then Webhooks, then Add webhook.
- Fill in the webhook form:
- Payload URL: the URL you copied above from Sourcegraph.
- Content type: this must be set to
application/json. - Secret: the secret token you configured Sourcegraph to use above.
- Which events: select Let me select individual events, and then enable:
- For repo changes:
push
- For Batch Changes:
Issue commentsPull requestsPull request reviewsPull request review commentsCheck runsCheck suitesStatuses
- For repository permissions:
Collaborator add, remove, or changedMembershipsOrganizationsRepositoriesTeams
- For repo changes:
- Active: ensure this is enabled.
- Click Add webhook.
- Confirm that the new webhook is listed.
Permission changes can take a few seconds to reflect on GitHub. To prevent syncing permissions before the change reflects on GitHub, the permissions sync will only occur 10 seconds after the relevant event is received.
Done! Sourcegraph will now receive webhook events to sync data with lower latency and more efficiently.
GitLab
GitLab webhooks can be installed at the repository or project level. We strongly recommend using project-level webhooks to decrease the amount of work needed to add webhooks to every repository and ensure that new repositories have them added as well.
If you use multiple projects, make sure to configure the webhooks in all of them. The same webhook in Sourcegraph can be connected to multiple projects.
We currently do not support system webhooks, these do not provide the data needed for Sourcegraph.
- Copy the webhook endpoint displayed after adding the incoming webhook as mentioned above
- On GitLab, go to your project, and then Settings > Webhooks (or Settings > Integration on older GitLab versions that don't have the Webhooks option).
- Fill in the webhook form:
- URL: the URL you copied above from Sourcegraph.
- Secret token: the secret token you configured Sourcegraph to use above.
- Trigger:
- For repo changes:
Push events
- For Batch Changes:
Merge request eventsPipeline events
- For repository permissions:
- Not supported
- For repo changes:
- Enable SSL verification: ensure this is enabled if you have configured SSL with a valid certificate in your Sourcegraph instance.
- Click Add webhook.
- Confirm that the new webhook is listed below Project Hooks.
Done! Sourcegraph will now receive webhook events to sync data with lower latency and more efficiently.
Bitbucket server
The Sourcegraph Bitbucket Server plugin enables the Bitbucket Server / Bitbucket Data Center instance to send webhooks to Sourcegraph.
Webhooks with the plugin can be installed globally, which is recommended to cover for all repositories.
- Install the latest version of the Sourcegraph Bitbucket Server plugin on your Bitbucket Server / Bitbucket Data Center instance.
- On your Bitbucket Server / Bitbucket Data Center instance, go to Administration > Add-ons > Sourcegraph
- Fill in the Add a webhook form
- Name: A unique name representing your Sourcegraph instance.
- Scope:
global. - Endpoint: The URL found after creating an incoming webhook.
- Events:
- For repo changes:
repo:refs_changed
- For Batch Changes:
repo:build_statuspr:activity:statuspr:activity:eventpr:activity:rescopepr:activity:mergepr:activity:commentpr:activity:reviewerspr:participant:status
- For repository permissions:
- Not supported
- For repo changes:
- Secret: The secret you configured when creating the incoming webhook.
- Confirm that the new webhook is listed under All webhooks with a timestamp in the Last successful column.
Done! Sourcegraph will now receive webhook events to sync data with lower latency and more efficiently.
Bitbucket cloud
Bitbucket Cloud webhooks can be installed at the repository or workspace level. While we recommend installing them at the workspace level, the setup for them on the Bitbucket side is unfortunately a bit more involved.
Using workspace level webhooks is the recommended way to add webhooks to all repositories in a workspace.
To install a webhook at the workspace level, you have to use the REST API. Bitbucket does not expose a UI to create those.
Follow the REST API docs from Bitbucket. To create a workspace webhook via the API, you need to temporarily create an app password.
This password requires webhook read & write and repo read scope, and you must be a workspace owner. You can then use the following command to create the webhook, and fill in the JSON properties as follows:
- Description: A unique name representing your Sourcegraph instance.
- URL: The URL found after creating an incoming webhook.
- Events:
- For repo changes:
repo:push
- For Batch Changes:
pullrequest:createdpullrequest:updatedpullrequest:changes_request_createdpullrequest:changes_request_removedpullrequest:approvedpullrequest:unapprovedpullrequest:fulfilledpullrequest:rejectedpullrequest:comment_createdpullrequest:comment_updatedpullrequest:comment_deletedpullrequest:comment_resolvedpullrequest:comment_reopened
- For repository permissions:
- Not supported
- For repo changes:
- Secret: The secret you configured when creating the incoming webhook.
BASH$ curl -vf -X POST -u <YOURUSERNAME> -H 'Content-Type: application/json' https://api.bitbucket.org/2.0/workspaces/<YOURWORKSPACE>/hooks -d '
 {
    "description": "<DESCRIPTION>",
    "url": "<WEBHOOK_URL>",
    "active": true,
    "secret": "<SECRET>",
    "events": [
        <LIST_OF_EVENT_NAMES>
    ]
 }'
Once created, you can verify it is correctly configured through the UI, by going to any repository in the workspace, then go to Repository settings in the sidebar, and then select Webhooks. The webhook should appear under workspace hooks:

Done! Sourcegraph will now receive webhook events to sync data with lower latency and more efficiently.
Alternative: Creating a repository level webhook from the UI
- On Bitbucket Cloud, go to each repository, and then Repository settings > Webhooks.
- Click Add webhook.
- Fill in the webhook form:
- Title: Any title.
- URL: The URL found after creating an incoming webhook.
- Triggers:
- For repo changes:
Push
- For Batch Changes:
Repository > Build status createdRepository > Build status updatedPull request > All events
- For repository permissions:
- Not supported
- For repo changes:
- Click Save.
- Confirm that the new webhook is listed below Repository hooks.
Done! Sourcegraph will now receive webhook events to sync data with lower latency and more efficiently.
Azure DevOps
Experimental webhook support for Azure DevOps was added in Sourcegraph 5.0, and does not currently support secrets. Please contact us with any issues found while using webhooks.
- On Azure DevOps, go to each project, and then Project settings > General > Service hooks.
- Click Create subscription.

- Select Web Hooks and click Next .

- From the Trigger on this type of event drop-down, choose:
- For repo changes:
- Not supported
- For Batch Changes:
Pull request updated
- For repository permissions:
- Not supported

- Not supported
- For repo changes:
- Set the filters how you like, or leave them at the default: [Any] and click Next.
- Fill in the webhook form:
- URL: The URL found after creating an incoming webhook.
- Leave the rest of the fields on the default values.
- Click Test to verify the webhook works. Then click Finish.
- Repeat the steps above, this time choosing Pull request merged as your event type.
Done! Sourcegraph will now receive webhook events to sync data with lower latency and more efficiently.
Webhook logging
Sourcegraph can track incoming webhooks from code hosts to more easily debug issues with webhook delivery. These webhooks can be viewed in two places depending on how they were added:
- Via Site Admin > Configuration > Incoming webhooks
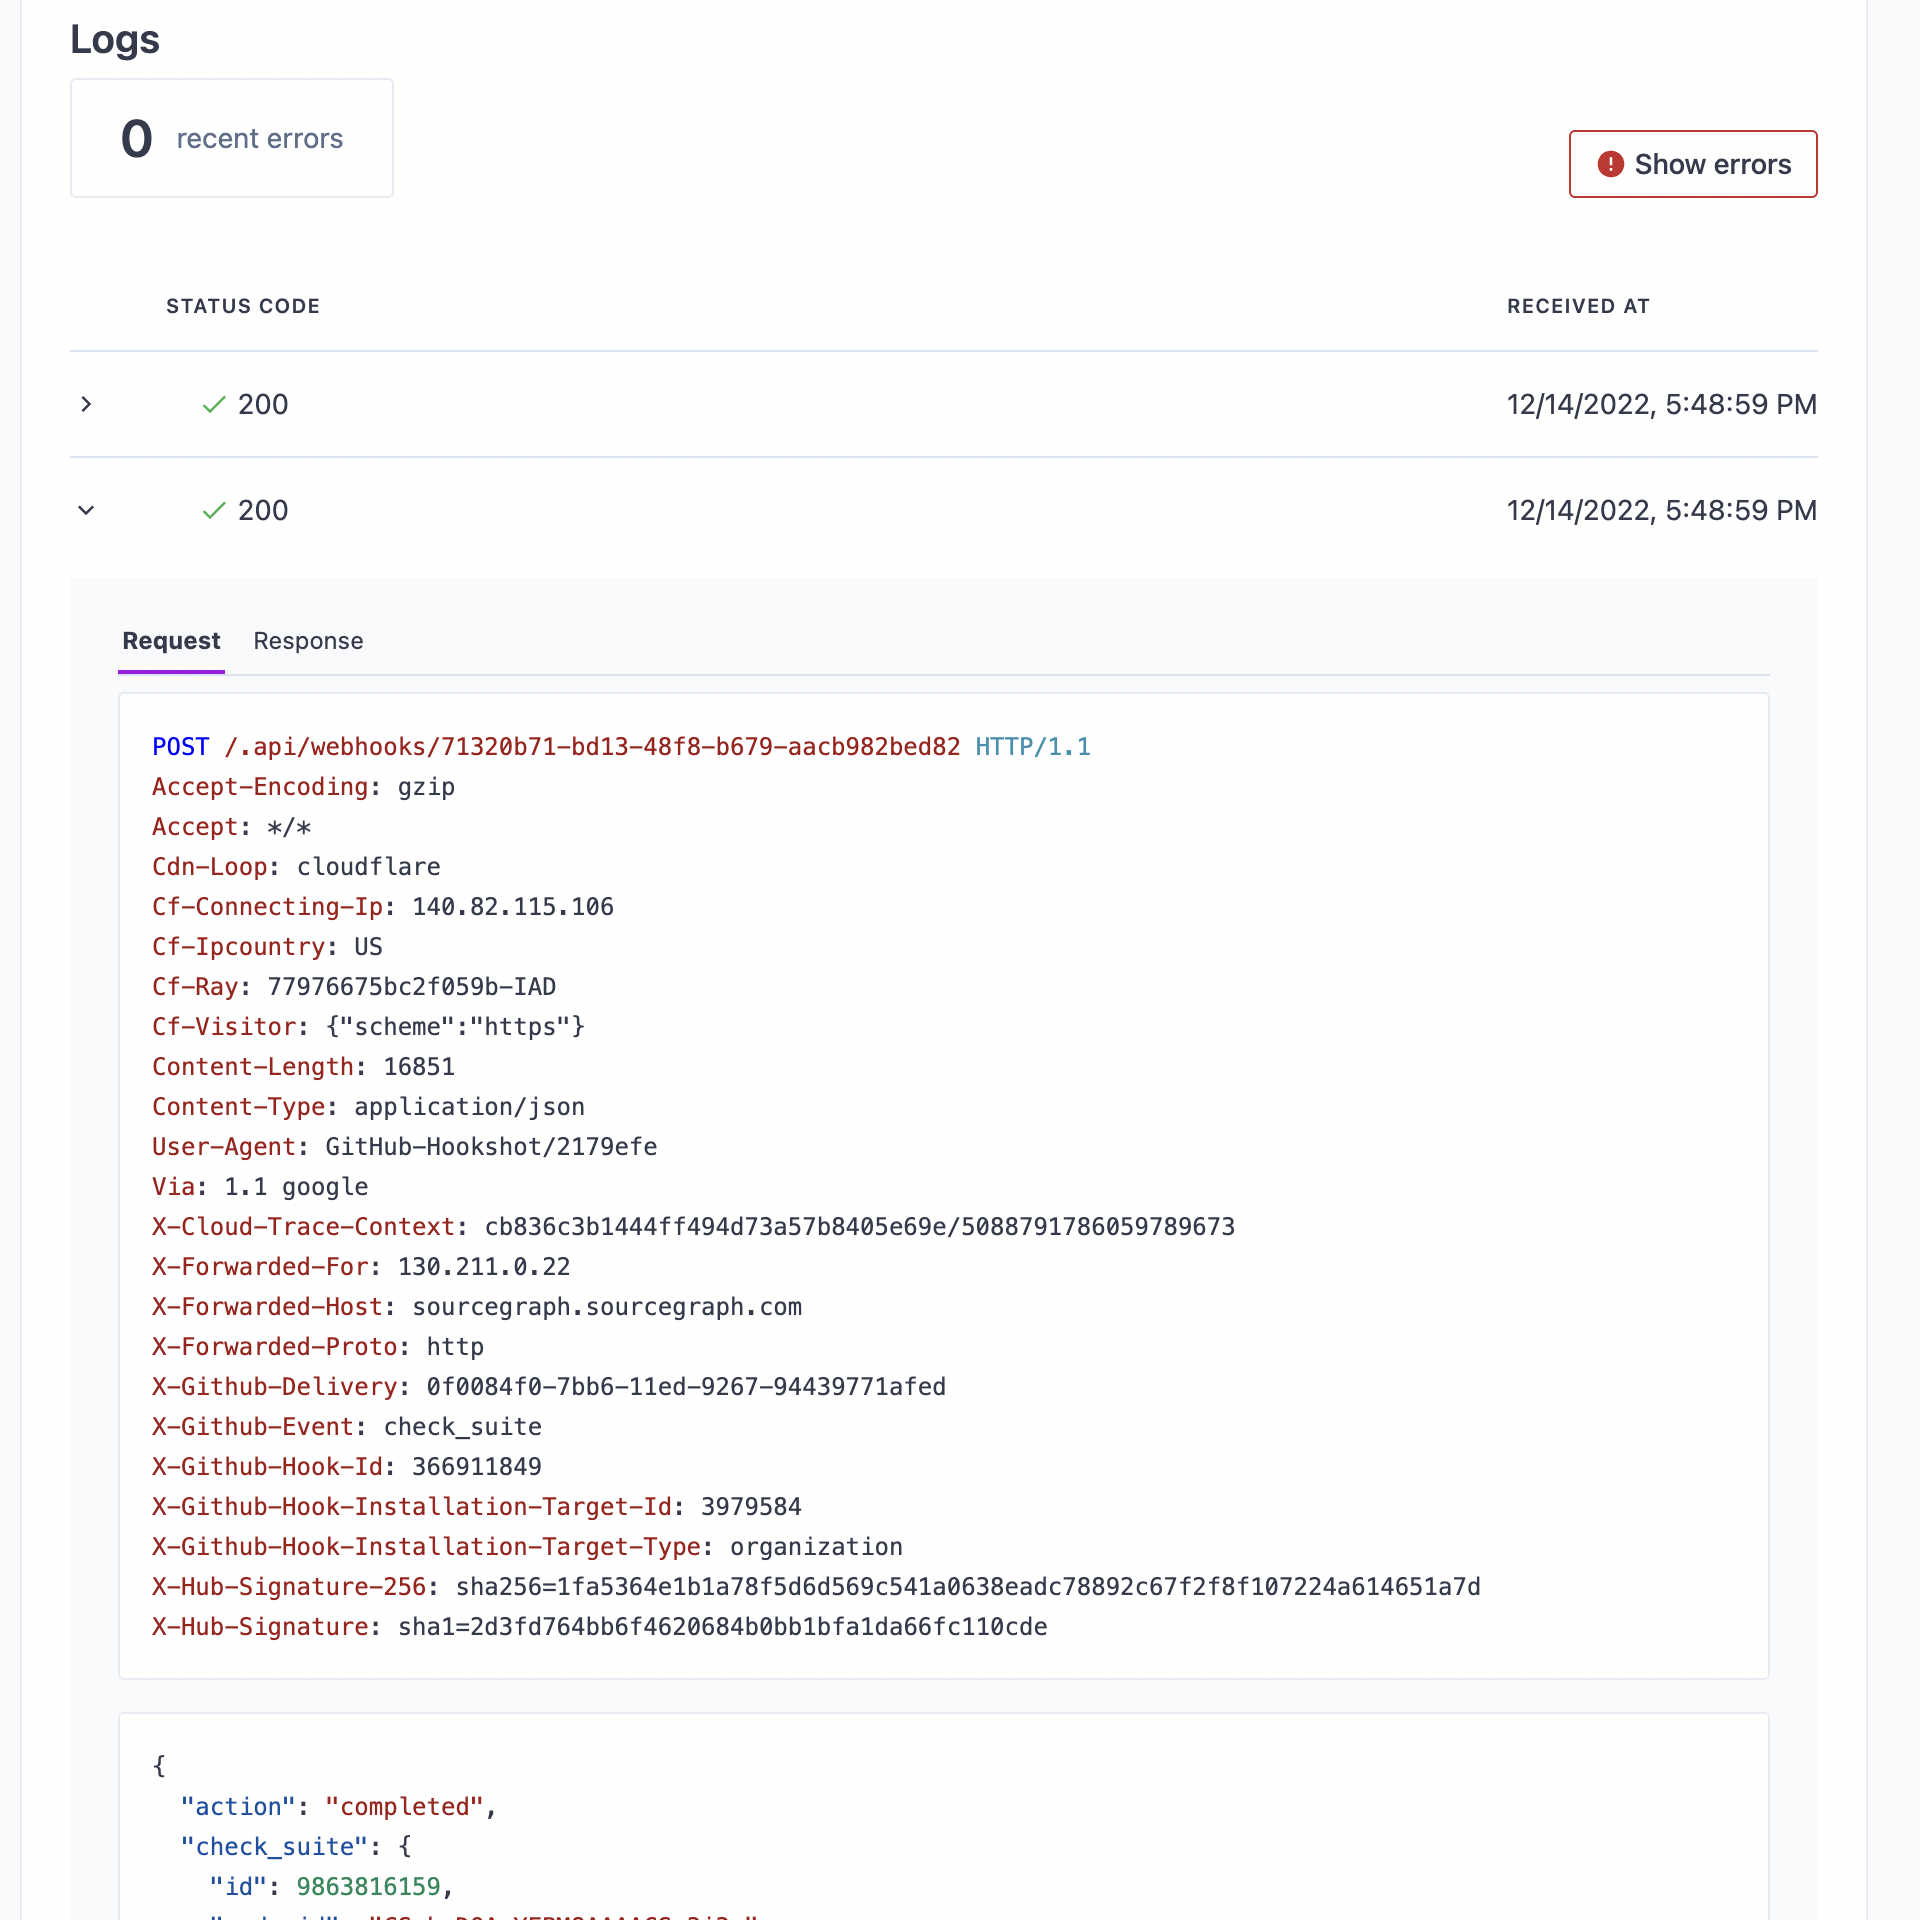
- Deprecated Via code host connection: Site Admin > Batch Changes > Incoming webhooks

By default, sites without database encryption enabled will retain three days of webhook logs. Sites with encryption will not retain webhook logs by default, as webhooks may include sensitive information; these sites can enable webhook logging and optionally configure encryption for them by using the settings below.
Enabling webhook logging
Webhook logging is controlled by the webhook.logging site configuration
option. This option is an object with the following keys:
| Key | Type | Default | Description |
|---|---|---|---|
enabled | boolean | If true, incoming webhooks will be stored. | true if no site encryption is enabled; false otherwise. |
retention | string | The length of time to retain the webhooks, expressed as a valid Go duration. | 72h |
Examples
To disable webhook logging:
JSON{
	"webhook.logging": {"enabled": false}
}
To retain webhook logs for one day:
JSON{
	"webhook.logging": {
		"enabled": true,
		"retention": "24h"
	}
}
Encrypting webhook logs
Webhook logs can be encrypted by specifying a webhookLogKey in the on-disk database encryption site configuration.